Search for lenses, articles and help
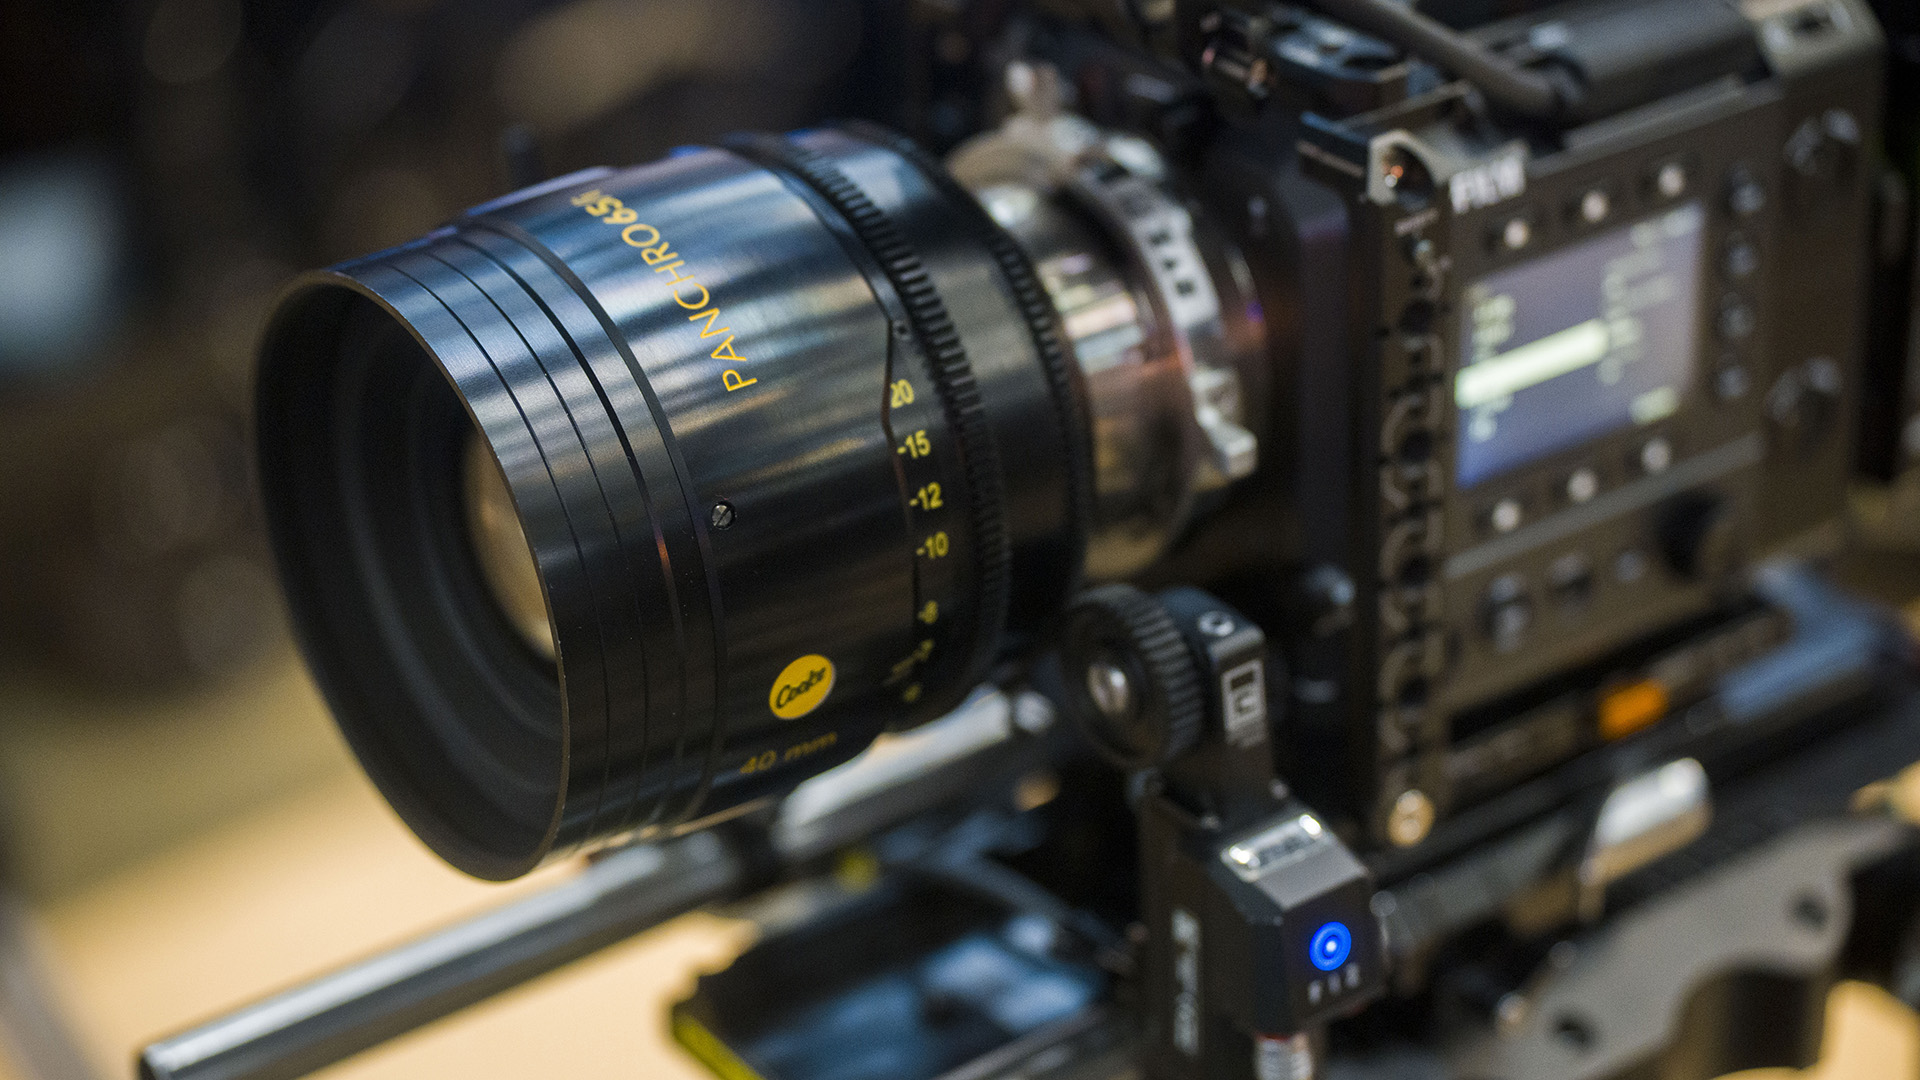
There’s been a recent surge of interest in larger digital imagers. This is far from the first time the industry has moved in this direction – the same shift happened in the film world decades before anyone had a digital sensor to contend with.
This article aims to summarise this recurrence and touch on how manufacturers adapt to larger imager sizes and the opportunities this presents to cinematographers. There will be explainers on the ideas of image circles, format sizes and aspect ratios.
Every lens, no matter the camera it sits in front of, projects a circle of light. What that circle covers, and what it doesn’t, helps explain the story of format history, and it’s the story that leads to Cooke’s latest largest image circle offering, the Panchro 65/i.
We will use the term “imager” as a catch all term for digital sensors and film formats. We talk about that in millimetres – its physical real-world size. A “format” is simply the name given to a particular set of those dimensions. In terms of photographic film emulsion systems, the most common format recognised today is 135 (also known as 35mm).
In digital cinematography the idea of format should still be associated with the PHYSICAL dimensions of the imager and we’ve seen a move from the Super 35mm standard to the Full Frame standard in digital cameras over recent years. Let’s delve into this in more precise detail.
Still Photography 35mm (known as the aforementioned 135 format) and motion picture 35mm are exactly the same size film – 35mm across and including the perforations. The orientation of that emulsion can be different in either system and alters the individual frame size as well.
An individual frame of 135mm stills film is 8 perforations long and runs horizontally inside of the camera. The active exposed area inside of the perforations is 36mm wide by 24mm tall which gives you 1.5:1 aspect ratio and 43.27mm diagonal.
If we take that film and turn it vertically, this is the way film usually travels through a motion picture camera and the capture width is confined to the space between the perforations running vertically, but we still refer to it as 35mm gauge because this is measured to include the perforations, gauge doesn’t relate to orientation.
This makes Super 35 – which came about in 1954 and was popularised in the 1980s – the format that uses the most negative area of any vertical 35mm motion picture film format. That is dimensions of 24.89×18.67mm with 4 perforations being used per frame for a 1.33:1 aspect ratio and 31.11mm diagonal.
We recognise the 135 format – that horizontal 8 perf – nowadays as “Full Frame”. When digital cameras took a foothold in the still photography industry in the 2000s manufacturers started to make a number of different sensor sizes so it led to the 36x24mm 135 standard becoming categorised as “full frame”.
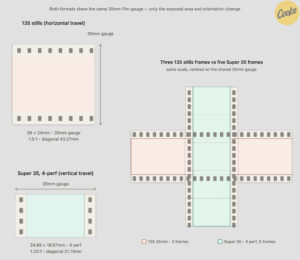
135 35mm Stills format compared to 35mm 4-perf motion picture format
Let’s take a step sideways and talk about aspect ratio. Simply this is the ratio of an image’s width to its height. If expressed as a ratio the height is always one (1) – or it can be expressed as dimensions in whole numbers, width x (by) height. For example, what we recognise today as HD Television widescreen 1.78:1 as a ratio or 16×9 as a dimension.
It’s important to talk about the regular, and intentional, mismatch between the capture aspect ratio of the imager and the delivery aspect ratio, whether this is for exhibition in a theatre or viewing elsewhere including online. Most of the world experiences aspect ratio through exhibition and viewing and when we discuss it as filmmakers, we are usually discussing the shape of the final exhibition of an image, rather than that of the imager that captured it. However, these ratios are often not the same for many different reasons and that’s been the case historically as well.
Simply put – when we say “what aspect ratio do we want to shoot in?” We usually actually mean “what aspect ratio do we want to frame for whilst shooting and then aim to exhibit in?”
The aspect ratio we’re capturing starts with the shape of the physical imager and is then manipulated going forwards. There are multiple choices of capture format aspect in the days of digital, but it was rarely standardised in the film days either. Now we also have digital options to window into the sensor and never record beyond a set limit at the time of capture; instead of cropping or letterboxing it away later we never capture it in the first place.
On set whilst shooting you can have as many framelines as you want nowadays and regularly people are having to shoot to serve multiple deliverable aspect ratios simultaneously such as 16×9 and 9×16 for vertical online video platforms.
In Theatrical exhibition and distribution there’s some standardisation. Cinemas with DCP projection usually only have a choice of two projection aspect ratios. 1.85:1 (known as flat) or 2.39:1 (known as scope). Now inside of that container you can letterbox or pillarbox for a different apparent aspect ratio, but the container is still the same size and the projector lens can’t always expand to make the most of the screen real estate apart from the 1.85:1 or 2.39:1.
If the cinema doesn’t have adjustable matting (curtains or other physical blanking) then it’s going to appear to the audience as though the picture isn’t filling the whole screen, because it isn’t. This might alter contrast perception – or perhaps even confuse the audience. Maybe that’s something you want to avoid or perhaps it’s desirable, but either way it’s something to consider.
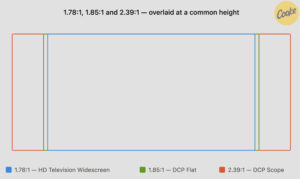
1.78:1, 1.85:1 and 2.39:1 – overlaid at a common height
With online delivery it’s a little more complex as you can deliver a video file in whatever aspect ratio you want by using custom dimensions, but it might not always be compatible with each viewing system and streamers in particular change how they ask for this to be delivered – either absolute with no black bars or inside a more standardised container more akin to the cinema world.
Now arguably it should always be a creative decision what aspect ratio to use for a project, but throughout film history it’s regularly been set by outside influences or trends. This could have been the studio, the exhibitors or even the camera manufacturer due to the physical nature of film capture and distribution. This is sometimes also the case today with multiple deliverables being demanded and trends being followed.
We can letterbox or pillarbox or in the case of anamorphic de-squeeze and these all change our final exhibition aspect ratio but none of them change our capture aspect ratio as this is set by the physical imager. That’s how it works if we’re on digital OR film.
On film the frame size and ratio of what was exposed onto each individual frame was set by the physical film gate size. The camera didn’t have different sensor mode options. There wasn’t windowing into the sensor or not capturing the full height or width (for the most part).
Your largest possible capture size then was limited to your film gauge. Across film history, especially in the early days, there were a plethora of gauges. As film innovations happened across the world and sometimes in direct competition with each other, there was very little standardisation. This meant different perforation sizes and placements, different dimensions and different aspect ratios. Over time certain gauges and aspect ratios persisted and have become standardised.
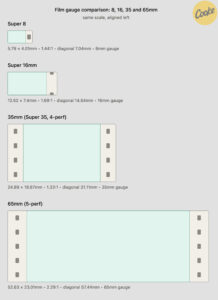
Film gauge comparison: 8, 16, 35 and 65mm – same scale, aligned left
In 2026 these are 8, 16, 35 and 65mm. If we purchased a roll of Kodak Vision 3 200ASA Tungsten balanced film stock in all of these film gauges we are looking at exactly the same film on a chemical level across all of them. What differs across those formats is the width of the film and the placement of the perforations.
Now inside of these gauges there are different capture areas per frame that depend on the orientation of the film (whether it’s running vertically or horizontally through the camera) and the number of perforations physically held in front of the shutter per frame. This combined gives you a capture aspect ratio and physical size.
Now this didn’t mean that the capture aspect ratio and projection aspect ratio back in the days of film were always the same. People would frame for a different aspect ratio in the camera compared to the one they were shooting in – usually with a marked up ground glass in the viewfinder serving the purpose of today’s digital framelines – and then place physical “hard mattes” into the process whilst making prints or, if open matte prints were supplied, at the point of projection in order to block out the excess area and to achieve the desired exhibition ratio.
Some film cameras DID even let you dial in these hard mattes at the film gate inside the camera so the exposed area matched the area you wanted to exhibit and never captured anything more but this approach wasn’t favoured by the studios. “Why am I paying for it if you’re not going to expose it?”

Projectionist memo from Stanley Kubrick for Barry Lyndon (1975, cine. John Alcott BSC)
This brings us to the importance of image circles. Put simply, this is the diameter in millimetres of what is projected out the back of a lens. A spherical lens gives an image circle that is equal in angle of view all the way around that circle – across, top to bottom and everything in between – or at least that’s what optimised lens design aims for in the spherical lens world.
Anamorphic lenses give an image that is usually squeezing a wider horizontal field of view into the image circle. The orientation can be different but it’s usually a squeeze on the horizontal axis. Crucially though this image still comes out the back of a lens as a circle. With that in mind it’s clear that image circle size does not set aspect ratio. One is a circle, the other is a box.
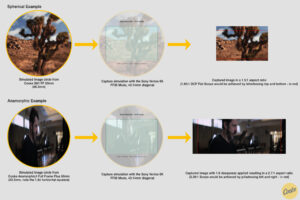
The capture process with spherical and anamorphic lenses using a constant imager.
A lens will always cast the same size image circle out of the back of it no matter what imager size you put the lens on or what you point it at. As such, the diameter of a lens’ image circle ends up dictating the maximum physical size an imager can be to achieve coverage across the entirety of it.
The smaller the receiving imager’s size, the less of a lens’ projected image circle will actually be “seen” by that imager. We will capture a narrower angle of view with that particular lens/imager combination compared to the same lens on a larger imager. Therefore, two different sized imagers will have appreciably different angles when fitted with the same focal length lens.
People say a 50mm is a 50mm and that’s true because the focal length of a lens doesn’t change based on what sized imager it goes on. The focal length is set by the manufacturer of the lens and is imager agnostic, just like the image circle, BUT your angle of view of the lens, which is expressed in degrees, does change based on the imager it goes onto because that’s measured based on what the imager sees inside of the image circle. A 50mm lens on 65mm gauge imager would give a pretty wide angle of view, but on Super16 it would be long. The physical focal length of the lens hasn’t changed, but the angle of view has narrowed because of the smaller imager the lens has been moved to.
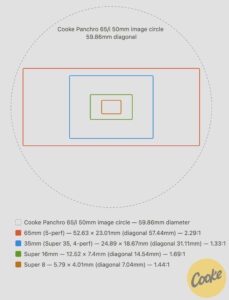
Image Circle of a 50mm Panchro 65/i with various film sizes overlaid. The image circle covers all of them and the angle of view narrows as the format size decrease.
In Cooke’s Panchro 65 range the widest focal length is a 30mm. We might think that doesn’t sound like a wide angle because we’re conditioned to think that wide angle lenses have focal lengths like 18mm or 21mm but that’s based on an assumption of imager size. On the approzpriate 65mm imager the lens is designed for, a 30mm is a wide-angle lens. It’s not enough then to just know the focal length – we have to consider imager size and then the resulting angle of view.
Lenses are designed with an imager size in mind – otherwise a lens designed for the 16mm film gauge for example could have a needlessly larger than required image circle.
That means the lens would be bigger and heavier and more optically complex than it had to be for that format. On top of that reaching an attractive wide-open T-stop that would compete with a lens designed solely for that format class would add even more complexity and weight. It would snowball.
So manufacturers choose a format to design for, working towards an image circle that suits. That hasn’t always been an easy thing to do because the imager sizes have always been changing and it’s been that way from the start.
Every lens will perform best at its optical centre if it hasn’t been modified. That’s the rules of physics. Lens designers go to impressive lengths to make that change in performance across the lens as imperceptible as possible and most of the time any top-level aberrations will appear mostly at the edges.
Now whether or not those are desirable or suitable aberrations comes down to the individual filmmaker to determine, but it’s worth considering that putting a lens on a format it isn’t designed for won’t truly represent that lens as the designer intended. That misrepresentation for example could be putting a lens designed for 65mm on 16mm and losing all the character at the edges – character that was designed into the lens. Or it could be putting a lens designed for Super 35mm format on a 65mm imager and introducing portholing because it doesn’t have the image circle required.
Super 35 (24.89×18.67mm with 4 perforations being used per frame, running vertical, giving an aspect ratio of 1.33:1 and a diagonal of 31.11mm) was long considered the holy grail of electronic imager sizes since the introduction of digital video cameras. Early on most digital imagers were much smaller than Super 35 but eventually they grew.
In 2011 Red Digital Cinema’s move to the MX sensor in their Epic camera crossed the Super 35 threshold and this trend continued. Thankfully lots of lenses around at the time could accommodate this slight increase but it started to tax the image circle coverage of some glass and particularly zoom lenses. This “defying” of conventions though didn’t stop and shortly afterwards Arri introduced “Open Gate” mode on their Alexa sensor, which had previously been limited to capturing Super 35. Lens manufacturers needed to aim for a new target image circle size of 34.5mm.
By mid 2010s we were rapidly approaching the next accepted bench mark – Full Frame 135 still photography or in motion picture terms VistaVision. In 2015 Red released their first Full-frame imager as the VV (VistaVision) 8K Dragon. Sony released their VENICE Full Frame 6K camera in 2017 and in 2018 Arri introduced a 4K-capture compatible Alexa Camera that they chose to brand as the LF for Large Format.
The proliferation of these full-frame camera platforms has unsurprisingly necessitated that lens manufacturers create new lines of cine optics in support of these sizes.
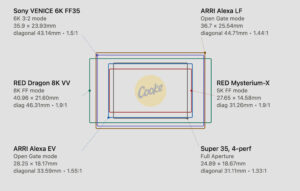
Full Frame Digital Sensor Comparison – centred on the same axis
So how about Digital 65? In 2014 Arri introduced the Alexa 65. In open gate mode the sensor captures at dimensions of 54.12×25.58mm with a diagonal of 59.86mm giving an aspect ratio of 2.12:1. This marked the first time a sensor in the digital cinematography world exceeded 65mm 5 perf film and created interest in rehousing and repurposing lenses originally designed for the 65mm film format of the 1950s and onwards. The Alexa 65 was, and remains, exclusive. Rental only from Arri for the biggest budget projects.
It took a decade to see things really picking up pace in this world of digital 65mm. Arri announced the Alexa 265 which is updated but provides the same sensor size as the original and it’s still a very rare high end camera system with limited supply. Blackmagic Design announced the Ursa Cine 17K 65 with a slightly smaller open gate mode than the Alexa 65 and 65mm 5 perf film. Fuji have their ETERNA 55 which took a different approach with a much taller sensor which, as its name suggests, isn’t the full 65mm gauge and has a smaller diagonal than the 65mm formats.
Most recently Sony announced the upcoming RIALTO 65 which brings the 65mm format to the VENICE 2. Remarkably this format delivers slightly more than the width of full aperture 5 perf 65mm AND much more height, leading to a massive image circle in its open gate mode. 53.75×35.83mm for an aspect ratio of 1.5:1 and massive diagonal of 64.60mm.
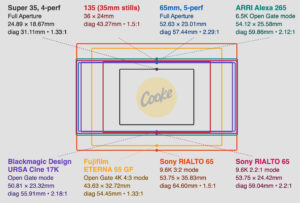
65mm Gauge Format Comparison – centred on the same axis
What does this mean for glass options? Well lenses that have been made for the original 65mm format and even slightly expanded digital 65mm format, with the shorter height, might not fully cover the RIALTO 65 open gate format but the extra covering power might make it possible, future experimentation will tell. This sensor size gives the ultimate 65mm gauge sandbox to play in. You can choose a sensor size, through imager mode or framelines, that is suitable for the project and distribution from a massive starting place in a small camera body.
Digital sensors around this size are really exciting – on film you had to purchase a negative, expose it, develop it and then print or scan it, and the process cost was only ever magnified for as the gauge increased. Now we can shoot with all the immediacy of digital and it’s exciting to consider how that will be used. We also have smaller cameras with no massive film magazines. Will we still want the weight that 70mm roadshow films had or will we want the camera to feel free and floaty? Well, that’s for cinematographers to experiment with… Cooke’s enabling of this format with the Panchro 65 is exciting and we’re curious to see what people will do with lighter weight, larger sensor cameras – it’s a far cry from bulky 65mm and VistaVision film cameras.
Back in the 2010s “Large Format” began to be used as a marketing term that was loosely applied to any digital imager that was fairly larger than the aforementioned 4-perf Super 35 class. Using the term this way is confusing because in stills photography it had been around for decades to define film camera formats greater than medium format which itself is already much larger than full frame. This marketing use of ‘large format’ then was a bit of a misnomer. With digital sensors orientated around the 65mm gauge we’ve seen an improvement of naming such as with Fuji – “ETERNA 55” and Sony “RIALTO 65” which has helped undo some of the confusion around “large format” usage.
We’ve been talking a lot about the maximum shooting size a particular imager offers but as previously noted we might not always be framing for and delivering in the same aspect ratio we shoot in. We hear lots now about open gate. Open gate doesn’t tell you the gauge of a sensor – it doesn’t tell you the format. Saying “this camera shoots open gate” actually means in plain speak that it has a mode that lets you capture the full physical dimensions of the sensor unhindered, but you need more information on the size of the sensor to know what that is as a dimension.
A camera with a tiny sensor can have an open gate mode – open gate doesn’t always mean a large imager. In the world of film this is usually referred to as “full aperture.” Nowadays with multiple deliveries or wanting to remain within the standard projection sizes it’s always worth thinking not only about how much of the sensor you’ll end up exhibiting, but also which lens characteristics will be on display once you’ve extracted, or cropped to your final aspect ratio. It follows, then, that you don’t always need to use lenses that have the image circle which covers your imager in open gate mode; you may wish to capture and exhibit less of the sensor and use a lens designed for a smaller format.
Whilst this is NOT something Cooke uses within their lens designs, let’s touch briefly on rear lens adaptors that alter a lens’ image circle.
An image circle expander, or focal expander, is a rear-mounted adaptor and sits between the lens and the imager. It increases the size of the lens’ projected image circle so that it can cover a larger sized imager than it was originally intended for. It attempts to do this with minimum degradation to the image quality and minimal loss of light but physics dictates that there will always be some degradation to both of these.
For example, a 1.4x expander will have a light loss of 1 stop. This loss happens because the expander is taking the illumination circle and spreading it over a larger area. Expander manufacturers also sometimes recommend that the working aperture shouldn’t exceed T2.8 to maintain performance of the expander and minimize induced aberrations.
On the flip side is a focal length reducer, more recently known as a “speed booster” in recent years with the rise of Metabones and the move from mirror to mirrorless cameras. Also rear-mounted these adaptors were most commonly aimed at using full frame (36x24mm) lenses on smaller imagers such as micro 4/3, APS-C or Super 35. The focal length reducer shrinks the diameter of the lens’ image circle and reduces the effective focal length of the lens. The light transmission is increased and the crop factor is counteracted.
Both of these adaptors won’t necessarily work with every lens and imager combination. There needs to be enough back focus distance for the adaptor to sit between the rear of the lens and the imager. An expander for example rarely works with cameras that have a spinning mirror (film cameras). And certain lenses with protruding rear elements will collide with the expander. Testing of specific combinations is required if going down this route.
As such the most efficient way is to pick an imager size and lens’ image circle that complement one another to get the truest representation of the lens’ character and avoid unnecessary bulk or the potential for not having enough coverage.
The weight of a cinema lens is part of the considerations of the optical and optomechanical design teams. It is usually more favourable to have a lighter lens than a heavier one, but build quality and serviceability should always be considered. When it comes to the glass it is apparent that the more elements contained within a lens, the heavier it will be.
Cooke always put a massive amount of consideration into choosing the correct glass types and this goes beyond just the optical properties of the glass. Glass density, cost, availability, thermal properties and environmental stability are all balanced. With Panchro 65/i the aim was to align closely with the original 65mm format Panchro design. The design is based around the efficient and powerful Cooke Triplet with optimised elements and with the deliberate intention to be lightweight and highly useable.
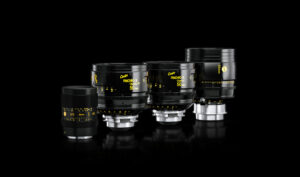
The optomechanical design must consider the size and design of the housing, weight of its structural components and materials used for construction. At Cooke emphasis is put on being solid and robust to withstand the film set for decades whilst also achieving a weight that enables productions. For the mechanical design of the Panchro 65/i we’re using the same materials that we use on our other lenses which have been consistently depended upon and lauded by film crews over the decades as being robust and also offering ease of servicing. The lens focuses by moving all of the glass together in a single block, the same as the Speed Panchros which helps reduce the physical dimensions of the lens and improves weight distribution.
Who knows what the future of imager sizes holds, but as has been the case throughout Cooke’s history we will support and enable filmmaking at all levels and with the expanse of the Panchro ecosystem this now encompasses everyone from mirrorless shooters with SP3 to the largest epics with Panchro 65/i. The famous look and a timeless design.